
How To Make Your Own Apple Cider Vinegar
Apr 17, 2024
As we move towards autumn I notice the smell in the air, the light cast by the sun, and colour of leaves take on a distinct change. I can’t believe the Autumn Equinox is just a week away— a sure sign of deepening into the the fall, which will certainly draw me more internal. Since childhood, there is no sign more telltale that autumn is here then apples ripe on the tree. And apples ripe on the tree indicate it’s time to make apple cider vinegar, one of nature’s powerful healing elixirs and one of my favourite autumnal home garden projects.

Apple cider vinegar is easy to make and each time I do, I think back to the hundreds of generations of people who have been doing so before me. One of the many reasons I love making traditional recipes is the connection I feel to the long line of medicine women before me. It’s a small way I can honour their lineage and gifts.
The naturally containing good bacteria (“probiotics”) in apple cider vinegar (ACV) assists our body in breaking down food and increases our own stomach acid production. This is a old fashioned digestive aid that settles an upset stomach and helps to increase our own digestive enzyme secretion.. Apple cider vinegar makes an excellent hair rinse, especially in the treatment of dandruff or fungus on the scalp and it makes a fabulous facial toner. For these two purposes, you must dilute with 50% water or else it’ll really sting!.
The National Arthritis Association lists it as a potential remedy for easing arthritis due to its acid content. ACV helps to break down undigested food, balancing blood sugar levels (thus minimizing food cravings), and improving overall efficiency of digestion. I’ve had many people in my practice use it for eliminating Gout — with success I’m happy to report.
How much do you consume? Just 2 tablespoons taken a day is the general dose for gaining health benefits from apple cider vinegar. Yes, you can mix it with water and honey to make it more palatable. And you can also add it to salad dressings, veggies and more. Just do not cook it or heat it excessively or else you’ll kill all the good stuff.
HOW TO MAKE YOUR OWN APPLE CIDER VINEGAR
**If you cannot make your own apple cider vinegar, you can purchase some at your local health food store or natural grocer. However, read the fine print on the bottle and ensure that it is organic and unpasturized apple cider vinegar.
1. Start by either pressing your own apples for juice, or purchase some freshly pressed apple juice from a local farmer. real, whole, unadulterated apple juice with nothing added. If you purchase frozen apple cider set it out to defrost.

Apple juice pressed from our apples
2. Next, find yourself a large, wide mouth glass jar (canning jars work great) or earthenware crock. Clean it meticulously. Then dry it, and pour your juice into the vessel.

3. Cover your container with a breathable fabric, like a cotton cloth to prevent dust, bugs, or other unwanted particles from entering your cider. You WANT some healthy air exchange for it to breathe. Keep in mind that this substance is alive. Anything that is alive, ferments. We want to assist in the fermentation process.

I like to cover my crock with a tightly woven, very clean and dry cloth. I tie it with a string to fasten it, and as always, I date the cider so I have a record of how long it took to get the right taste and acidity to my liking.

That’s it! You do not need to add anything to it. The next step is just to let mamma nature do her magic.
How do you know it’s done? Taste it. It can take anywhere between 3 weeks or more to get the acidity that’s just right. I find that 3 or 4 weeks usually makes for a good cider vinegar. If you like, you can purchase pH strips from a health food store or wine making shop and test it for acidity. You’re looking for a pH reading below 4.5. However it is not necessary to test your vinegar with strips. Let your taste buds be your guide.
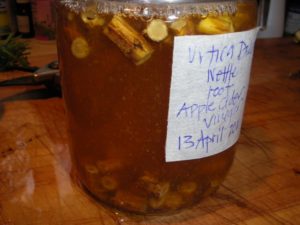
(photo below: after 4 weeks it’s a very tart, strong vinegar. Here I’m pouring it over nettle roots for a yummy, medicinal vinegar).

NOTES:
- Within a few days – depending on the temperature outside and in your home – a frothy foam may manifest. That’s ok, it means that the natural sugars are being digested by the good bacteria and fermentation is taking place. You can, with a clean spoon, scoop away the foam.
- You will notice clumps of concentrated particles begin to form this is called the “Mother”, and is a positive sign. Do not scoop these away! This is a concentrated colony good bacteria. Some people prefer to filtre these out once their cider is done, and compost them. It’s a personal preference. You can also save the mother to add add to your next batch of juice to speed up the process of a fresh batch of cider–however in this case they’d need to be used immediately.
NOW WHAT?
Once you’ve reached the acidity you like (determined by taste or test strips), strain it through a mesh strainer and either compost the majority of the “Mother” or hold it back for a new batch (remember it must be used immediately). Bottle the cider vinegar in clean glass bottles. Mason jars will work, so will wine bottles, or anything else you like. It does not need to be refrigerated; but if you do, that’s okay too. It will naturally age, slowly, over time.
Now, use it in salad dressings, pour it over your food, take in water, tea, mixed with honey, or any other which way you like. As mentioned, my favourite is using it for even further health benefits by turning it into a medicinal herbal vinegar. I hope you find this home project as satisfying as I do.
Enjoy!
Seraphina
